| |
 |
|
|
|
|
|
| |
 |
| |
CLR-KVM-A801 |
| |
|
| |
8x1 HDMI KVM Switch |
| |
Control via buttons, RS232, IP commands, IR and keyboard hot keys. |
| |
USB 2.0 hub and USB 2.0 keyboard/mouse ports |
| |
|
|
|
|
| |
|
|
|
|
|
|
| |
Features |
|
| |
|
|
| |
- Uses one USB console controls 8 HDMI computers |
|
| |
- Supports Unix/Windows/Debian/Ubuntu/Fedora/Mac OS X/Raspbian/Ubuntu for Raspberry Pi and other Linux based system |
|
| |
- With EDID emulators in every input ports, provides PCs always have correct display information |
|
| |
- Supports hot plug, connect or disconnect devices to the KVM switch in any time and without turning off devices
|
|
| |
- Supports auto switching to monitor computers in a specified time interval |
|
| |
- Supports front panel buttons, IR signals, keyboard hot keys, RS232 serial commands or IP commands to control KVM switch |
|
| |
- Available to use keyboard without any delay after switch input sources |
|
| |
- Supports resolution up to 3840*2160@30Hz |
|
| |
- With extra standard USB 2.0 hub port, it is possible to connect bar code scanner, USB hard drive or other USB devices to KVM just as you have plug these devices directly to computer |
|
| |
- Supports DVI-D single link sources and displays with the use of HDMI-to-DVI adapters |
|
| |
|
|
| |
LEDs & Ports |
|
| |
|
|
| |
 |
|
| |
|
|
| |
1. IR receiver extension cable input
2. DC 12V Power Adapter
3. 3 Pins jack for RS232 console
4. USB 2.0 Hub ports
5. HDMI output port
6. Keyboard and mouse input
7. HDMI input ports
8. USB data (Connected to PCs)
9. Auto scan time interval settings
[MIN]: Press button [MIN] to loop between 0~59 minutes.
[SEC]: Press button [SEC] to loop between 0~59 seconds.
[Set]: After setting minutes and seconds by buttons [MIN] and [SEC], press button [Set] to enter final scan time interval setting.
10. Status indicator:
Green LED: Normal status
Red LED: Auto scanning mode
11. IR receiver
12. LED display: display current selected input source
13. Keypad:
[1~8]: Press these buttons to directly select input 1~8 sources.
[Close]: Press this button directly will turn on or turn off the display out
[Scan]: Press this button to start or stop automatically scan between input 1 to input 8. The interval time can be set by buttons [Set], [MIN], [SEC] as described above.
14. LAN: TCP/IP console interface
15. Power switch: Turn on or off the power. |
|
| |
|
|
| |
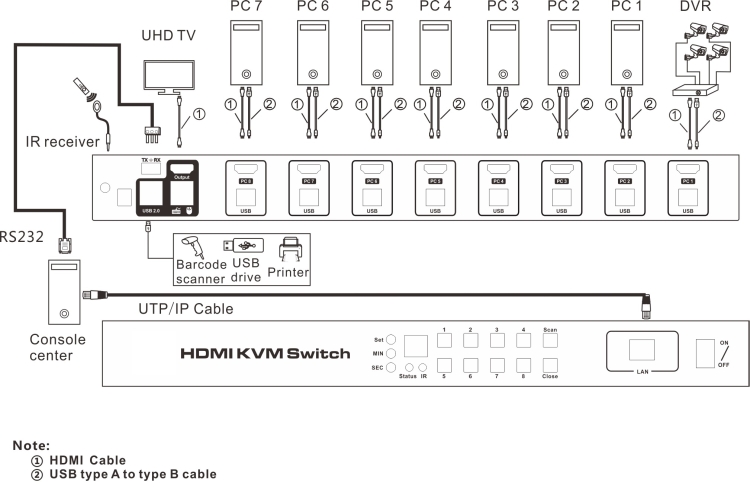
Connection Diagram |
|
| |
|
|
| |
 |
|
| |
|
|


